Some thoughts on programming stuff

Category: General (Page 2 of 7)

Test SharePoint e-mail settings with PowerShell

In case you want to test SharePoint e-mail settings with PowerShell, you can achieve that by sending a dummy e-mail to yourself by running a simple PowerShell script. In this way you can ensure your SMTP settings are good and all SharePoint notifications or coding solutions that send e-mails will work.

It’s important to test it during the configuration of a new Farm. The steps for configuring it can be found on Microsoft docs. Or maybe if you need to troubleshoot the e-mail features in your SharePoint solutions. SharePoint has many automated alerts that work with Workflows, Approval processes and Access control forms.

Electronic e-mail - Test SharePoint e-mail settings with PowerShell
E-mail is a common way to communicate and alert (Wikimedia Commons)

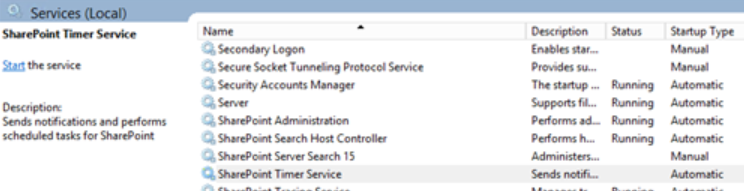
PowerShell script for testing SharePoint e-mail settings

The script is pretty straightforward and you will need to update just two lines. One with the right e-mail going to receive the message and the Site Collection URL that is going to trigger the message.

That’s it! I hope this script can help you when you want to test SharePoint e-mail settings with PowerShell. Also on creating new solutions for monitoring your e-mail settings on the SharePoint farms you happen to work with.

In addition to that, in case you are interested in, you can check other posts featuring PowerShell scripts.

References:
SharePoint diary

The Principles of DevOps

Have you ever imagined a world where Dev and Ops become DevOps? Well, I must say this world is real and we are living on it right now! That’s why I wrote this post to try to discuss The Principles of DevOps. The content was based on what I learned after reading the book The DevOps Handbook available on Amazon and after working in a DevOps role for more than one year. I’m also planning to write a series of posts to deep dive better in some concepts. So let’s go!

Basically, DevOps is based on three Principles:

  • At first, the Principles of Flow;
  • Second, the Principles of Feedback;
  • Last but not least, the Principles of Continual Learning.

Each one of them represents important steps and actions that should be taken by its practitioners. Always looking to improve their processes and deliver more reliable systems.

DevOps is more about a culture and a way of thinking, not about technologies. So you won’t see in this post content targeting specific applications like Azure DevOps ones I have written before.

DevOps Flow - The Principles of DevOps
DevOps Flow
Continue reading

Transform your text with String List Wizard

Hey guys, today’s post is just a quick one in which I would like to make an announcement. I have created a tool in the past few weeks just to help me and maybe you when you need to remove duplicated of a string or transform in a comma separated list. For that, you transform your text with String List Wizard tool. You can access the Tool by clicking on the link below:

Link: https://stringlistwizard.com/

The Tool is basically a PWA in which helps you on transforming some strings into something else. The idea is to save your time and be more productive, because you might need to remove the duplicated elements of a list of words or numbers, or even you want to transform them into something else like you would do with macro. Here you can find some presets for the most common use cases like the ones below:

Main Page - String List Wizard productivity tool
String List Wizard main page

String List Wizard Use cases

Imagine you have a long Excel list and you want to remove the duplicate cases, so you can copy all cells, paste them on the Input field, select “List no duplicates” presets and that’s it!
If you work with SQL and you want to generate a statement of IDs in one single line separating each one by comma, then just paste them on the Input field, select “Single quotes” or “No quotes” presets and that’s it!
Also you can use define your own presets that will be saved to be used later.

You can see how it works here:

Demonstration - String List Wizard productivity tool
String List Wizard demonstration

Options for your productivity

  • Replace text: this option allows you to replace characters using an array like parameters. Let’s say you want to replace every ‘-‘ with ‘_’ and every ‘,’ with a ‘;’. Then you can just configure something like [[“-“,”_”],[“,”,”;”]]
  • Split by: this options enables you to split the input based on some characters. A good example can be a phrase like ‘(DATA1)\\(DATA2)’ and you want to split each element in one line. So you can go ahead and configure something like [“(“,”\\”,”)”].
  • Case: this one defines if you will change the case, make everything uppercase or lowercase.
  • Order: this one defines if you will change the order and sort them by ascending or descending.
  • Prefix: the prefix will be inserted in the beginning of each element.
  • Postfix: the post will be appended to the end of each element.
  • Max elements per line: this options let’s you define how many elements will be grouped in each line.
  • Distinct values: self-explaining, but basically this one helps you on removing duplicating values.
  • Remove last char in last element from block: for those cases when you have one unnecessary character in the end of the transformation, you can check that and remove that last annoying char
  • Left pad: let’s you add characters of the beginning to the element until a length limit you define.
  • Right pad: let’s you add characters to the end of the element until a length limit you define.

Even more you can transform your text with String List Wizard in an app-like experience, since this is a progressive web app. In other words, you can add it to your cellphone or computer and use it as an App. It’s going to store each one of your settings on your machine and give flexibility to customize and reuse them when you reopen to the tool!

Batch insert items in SharePoint with Power Automate

This blog post will cover how to batch insert items in SharePoint with Power Automate. Our Flow will explore the SharePoint REST API calling the Batch endpoint and inserting 1000 items per time. For every Batch request made, you can add multiple Changesets up to 1000 Changeset requests. Likewise, for each Changeset, you can only add up to 1000 requests. That’s why our example will try to insert 1000 items per request just to make things simple.

In the tests I have made, using this Flow we were able to insert 5000 items in 16 minutes. All of my tests were executed in a Free Microsoft Flow account. In the other hand you probably may experience a better performance if you have a licensed account. Consequently, using a licensed account, you will be able to read more than 5000 rows.

In addition to that, it’s important to say that our test is going to read data from an Excel file. Everything will be static like the filename and the table name from the file. But this doesn’t mean that you cannot do the same by passing dynamic values. If you create a flow that runs tied to a file creation event in SharePoint, you will get the data needed to make it dynamic and save your time with this automation.

7 use cases on automating data entry using RPA and document ...
Machine working in favor of humans (Klippa)

First steps on the Flow

In this example I chose to manually trigger a flow, just for it being easy to test. Needless to say tat you can change that for whatever you want.

Manually trigger a flow - Batch insert items in SharePoint with Power Automate
Manually trigger a flow
Continue reading

Batch delete items in SharePoint with Power Automate

This blog post will cover how to batch delete items in SharePoint with Power Automate. Our Flow will explore the SharePoint REST API calling the Batch endpoint and deleting 1000 items per time. For every Batch request made, you can add multiple Changesets up to 1000 Changeset requests. Moreover, for each Changeset, you can only add up to 1000 requests. That’s why our example will try to delete 1000 items per batch request just to make things simple.

In the tests I made, using this example we are able to delete 500 items in 2 minutes, 5.000 items in 12 minutes and 15.000 items in 40 minutes. All of my tests were ran in a Free Microsoft Flow account, so you probably may experience a better performance if you have a licensed account.

How do I recover and restore deleted files? | BT
Delete key (BT)

First steps on the Flow

In this example I chose to manually trigger a flow, just for it being easy to test. Needless to say tat you can change that for whatever you want.

Manually trigger a flow - Batch delete items in SharePoint with Power Automate
Manually trigger a flow
Continue reading

Drop messages in IBM MQ using dotnet core

This blog post will cover how to drop messages in IBM MQ using dotnet core. The post is based on the other awesome post from dotnet cookbook which I recomend you to read! The objective here is to present an overview of the code, how to use the tracing logs for troubleshooting connections and how to add certificates to perform TLS connections, all of these using the library ibm-mq-client available in Nuget.

A queue (Tensator)

The code to drop messages in IBM MQ

The code basically relies on some parameters for hostname, channel, queue manager, queue and port. Also there are some checks based on the name of those parameters to decide if they contain the pattern “.TLS” in the string. But if in your case you always use TLS on your connections, you can just remove that condition and let the SSL_CIPHER_SUITE_PROPERTY and SSL_CIPHER_SPEC_PROPERTY always available:

Using this code you should be able to drop messages, connect to the queues and achieve the result you want!

But if something goes wrong, you can always trace the messages made available by the library.

Continue reading

Jump to current date cell on Open in Google Sheets

If you are like me and usually updates manually a spreadsheet to track your progress in a daily basis related to something like diet or spenditures, you will know that your spreadsheet may become very long. That’s why I created an small script to allow me jump to current date cell on Open in Google Sheets automatically.

The script will run like a macro and after a few moments you have opened the spreadsheet, it will focus the correct cell!

Continue reading

Creating Scheduled Azure WebJobs

This blog post will teach you on creating Scheduled Azure WebJobs. The WebJobs are a method to run background tasks in Azure just like Windows Services. These Web Jobs are tied to Azure App Services and can be Continuous or Triggered.

The Continuous type will trigger as soon as it is deployed and can be debugged. Usually the developer controls it’s execution in an endless loop. In adition to that, it runs on all instances that your web app runs. As a draw back, it must have the feature AlwaysOn enabled. Basically, if you have a cheap subscription, you won’t be able to use that.

The Triggered option needs to be triggered manually or scheduled. This execution will only run on one instance of your application. Furthermore, it doesn’t allow remote debugging.

The following file types are supported to be a Web Job, according to Microsoft documentation:

  • .cmd, .bat, .exe (using Windows cmd)
  • .ps1 (using PowerShell)
  • .sh (using Bash)
  • .php (using PHP)
  • .py (using Python)
  • .js (using Node.js)
  • .jar (using Java)

Fortunatelly, what you want is to run a WebJob from time to time using the Triggered type! You will only need to understand CRON expressions to specify the schedule pattern. Please, check this FreeFormatter tool to configure your CRON expression.

According to Oracle, CRON expressions are strings consisting of six or seven subexpressions (fields) that describe individual details of the schedule.

Continue reading

Restart Timer and Admin in SharePoint

SharePoint relies on Timer Service and Admin Service to run and manage its tasks. As any Windows Service, sometimes we need to stop and start them. That’s why I wrote this post to share a script on how to restart Timer and Admin in SharePoint.

These services are present in a SharePoint Server, inside the Windows Services list. There you can see both SharePoint Administration and SharePoint Timer Service:

  • The Admin Service performs administrative tasks for Windows Services under the Local Admin Network rights;
  • The Timer Service sends notifications and performs scheduled tasks for SharePoint services. It must run with an Account with Admin rights to server.
Timer and Admin Services - Restart Timer and Admin in SharePoint
Timer and Admin Services

Script to restart the timer and admin services

The script will load the SharePoint PowerShell dependencies and start by restarting the services in each machine present in the farm. This can throw an error if the Windows Servers are not properly configured to allow remote changes to their services.

Finally, in the end we use some objects provided by the SharePoint DLL to ensure that every Timer service is online and available.

There are other services required to run SharePoint, but it depends on how you are exploring its features. Here is the list of possible mandatory services that you may face and even restart if you want (haha):

  • SharePoint Tracing;
  • SharePoint User Code Host;
  • SharePoint VSS Writer;
  • World Wide Web Publishing Service;
  • SharePoint Server Search.

That’s it! I hope this post can be helpful when you want to restart Timer and Admin in SharePoint. Also you may find useful other posts related to PowerShell in the blog posts available.

References:
StackOverflow

How to use virtual background in Teams

This blog post will show you how to find the buttons and how to use virtual background in Teams. The virtual background in Teams is a new feature recently added by Microsoft. I don’t know if it’s related to the concurrents being able to that like Zoom, but that’s a thing we can discuss later.

Opening the virtual background options

During a call or a meeting, locate the Teams Control Task Bar and click on the Three dots button:

Teams Control Task Bar - How to use virtual background in Teams
Teams Control Task Bar

A menu will popup! Here you must click on Show background effects to open the options available:

Finding the Show background effects - How to use virtual background in Teams
Finding the Show background effects

Virtual background options in Teams

The background settings available are:

  • No backgroud: just like you are used to;
  • Blur background: it will blur the background, letting it focus only on you;
  • Microsoft images: shows images from the interent to be used by you during your meetings;
  • Custom images: the images will show up in the end of the list based on what JPEG images you’ve put in ” %AppData%\Microsoft\Teams\Backgrounds\Uploads ” folder.

Once you select one of the options, you can hit the Preview button to see how it will look like. Once you are good to go, just click in Apply and the video effect will take place and everyone will enjoy it!

Background settings - How to use virtual background in Teams
Background settings

Setting blur background for Teams

If you are not feeling so creative or your real background is just a mess because you didn’t do your bed, just go for the Blur option:

Blur effect - How to use virtual background in Teams
Blur effect

Setting custom backgrounds for Teams

But if you have some nice background and wanna share with your colleagues just to make the meeting more fun or share a part of your personality, then stick with the custom backgrounds!

First you need to save a good JPEG image file inside a specific folder used by Teams:

Teams folder: %AppData%\Microsoft\Teams\Backgrounds\Uploads

Custom backgrounds folder - How to use virtual background in Teams
Custom backgrounds folder

After that, just reopen the Background effects windows and it will show up just like the image below:

Custom backgrounds in the end - How to use virtual background in Teams
Custom backgrounds in the end

That’s it! I hope you learned how to use virtual background in Teams.

References:
Republic world

« Older posts Newer posts »

© 2024 wiliammbr's blog

Theme by Anders NorenUp ↑