This blog post will teach you on creating Scheduled Azure WebJobs. The WebJobs are a method to run background tasks in Azure just like Windows Services. These Web Jobs are tied to Azure App Services and can be Continuous or Triggered.
The Continuous type will trigger as soon as it is deployed and can be debugged. Usually the developer controls it’s execution in an endless loop. In adition to that, it runs on all instances that your web app runs. As a draw back, it must have the feature AlwaysOn enabled. Basically, if you have a cheap subscription, you won’t be able to use that.
The Triggered option needs to be triggered manually or scheduled. This execution will only run on one instance of your application. Furthermore, it doesn’t allow remote debugging.
The following file types are supported to be a Web Job, according to Microsoft documentation:
- .cmd, .bat, .exe (using Windows cmd)
- .ps1 (using PowerShell)
- .sh (using Bash)
- .php (using PHP)
- .py (using Python)
- .js (using Node.js)
- .jar (using Java)
Fortunatelly, what you want is to run a WebJob from time to time using the Triggered type! You will only need to understand CRON expressions to specify the schedule pattern. Please, check this FreeFormatter tool to configure your CRON expression.
According to Oracle, CRON expressions are strings consisting of six or seven subexpressions (fields) that describe individual details of the schedule.
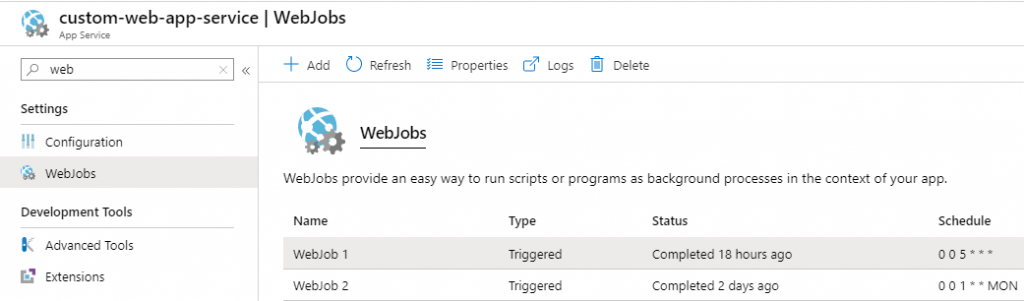
Scheduling the WebJob in Azure
Inside the administration of your Azure App Service you can find the WebJobs just like the image below:
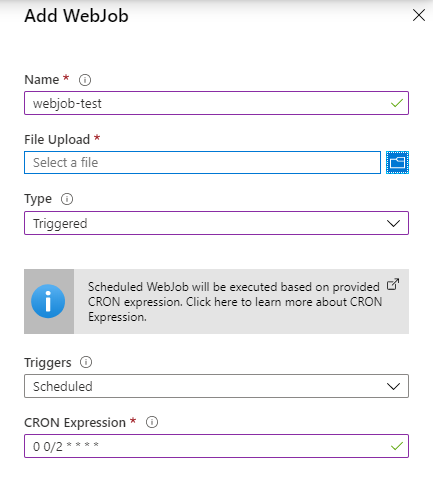
You can create here the Web Job just by configuring it:
- Define a name;
- Upload the file containing the script you are going to run;
- Define type as Triggered;
- Select the Triggers as Scheduled;
- Define a CRON expression to specify when it will run.
But maybe you are working with Visual Studio or Visual Studio Code, developing the job. If that’s the case, you can add a file that will publish the CRON expression automatically when you deploy the Azure WebJob from Visual Studio. You just need to add a file called settings.json in the root folder of your project or WebJob.zip file that will be uploaded in the form in the previous image.
Here you can see an example of a settings.json:
{ "schedule": "0 */15 * * * *" }
Anyway, I hope this blog post could help you on creating Scheduled Azure WebJobs. If you are interested and got some time, please check my other posts related to Azure.
References:
Microsoft documentation.

Leave a Reply